The Stockyard stores a wide range of pre-built items for inclusion in the project.

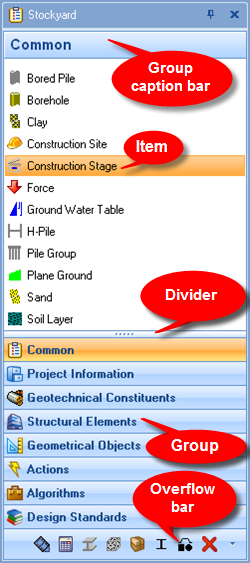
Items available to be added are organized into groups, e.g. Structural Elements, Project Information, Geotechnical Constituents, etc. Above the divider is a list of all the items included in the currently expanded group.
The group caption bar displays the name of the currently expanded group. This is also be highlighted in the list of groups below the divider.
The Common group includes the most frequently created items (many of which are repeated in other groups).
The divider is used to adjust the number of items and groups displayed in their respective lists.
Surplus groups go into the overflow bar at the bottom of the panel.
Further commands are available via the drop-down arrow on the right hand side of the overflow bar.
If an item is greyed-out then it is not available in the edition of Repute that is running.
The Insert tab is always visible on Re/x's Ribbon and provides buttons relating to the Stockyard. Clicking buttons on the Insert tab automatically opens the Stockyard and displays its corresponding group.
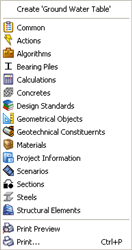
Right-clicking anywhere inside the panel reveals its context menu which gives options to expand Stockyard groups, create items, and printing the panel.

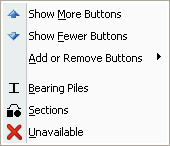
The drop-down menu is shown by clicking on the drop-down arrow in the bottom right-hand corner of the panel.
This menu allows you to see all available groups and adjust which are displayed in the panel's list of groups.

Left-click on the group name from the list below the divider or on the group icon in the overflow bar at the bottom of the panel
Or... Right-click and select the desired group name
Or...Click on the relevant button on the Insert tab
Adjust the number of groups listed
Left-click and drag the divider up or down
Or...
Left-click on the drop-down arrow in the bottom right-hand corner of the panel
Select Show More Buttons or Show Fewer Buttons from the menu
Add or Remove specific groups to the panel's list
Left-click on the drop-down arrow in the bottom right-hand corner of the panel
Select Add or Remove Buttons from the drop-down menu to view a list of all available groups
Left-click on specific group names to add or remove them from the list displayed in the panel
Left-click on the item name and drag it into the Project Manager (the mouse cursor picture changes when in the Project Manager to illustrate the item being created)
Or...Right-click on the item name and select Create <Name of item>
Creating an item opens the Project Manager (if not already displayed), which automatically selects the new item. The item is also selected in the Property Inspector (if open) so that its properties can be altered.
Left-click on the drop-down arrow in the bottom right-hand corner of the panel
Select the Unavailable group from the menu
Click on the Application Button (program logo in the top left of the screen)
Click on the Program Options button to open the Program Options box
Select the Stockyard page
Select or deselect the box that says “Hide disabled items”
Right-click anywhere in the panel and select Print from the context menu
Or... Type Ctrl+P