In Step 6, you will use the Calculation Wizard to create the calculation you want Repute to perform.
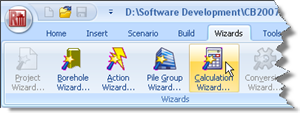
Open the Calculation Wizard by selecting the Wizards tab on Repute’s ribbon and then clicking the Calculation Wizard button.
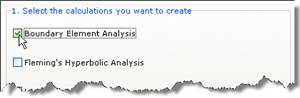
When the Wizard appears, select “Boundary Element Analysis”. (The calculations that appear here depend on which edition of Repute you are running. The Enterprise Edition provides more calculations than the Standard and Professional editions.)
Click Next to display the next page.
Since there are no standards to select from, click Next to display the next page.
Select “Stage 1” to link the boundary element analysis to that scenario.
Click Next to display the last page.
If you wish to review any of the settings you have made, click Back to return to the relevant page. Otherwise, click Finish to generate the calculation.
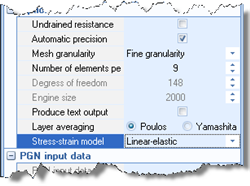
Finally, select “Calculation 1” in the Project Manager and then edit its properties in the Property Inspector. Change the Stress-strain model to “Linear-elastic” (where-upon the Non-linear options will disappear).
The Calculation Wizard does the following:
Creates Calculation 1
Links Calculation 1 to Stage 1
A copy of this step can be found at [Projects]\Tutorial 4\Step 6.rpx.
Step 7 - perform and review the calculation