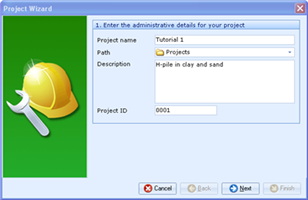
Project Wizard


Description

The Project Wizard helps you create a new project.

The best way to learn how to use this wizard is to follow Tutorials 1 to 6 in the Quick-Start Guide, which make extensive use of this wizard.

Below are screenshots of the different steps that the wizard takes you through.


Process

To create a new project, the Project Wizard takes you through the following steps:

Step 1 - Enter the administrative details for your project

Project name

This must be a valid Windows file name (excluding the characters + and ,). The Wizard creates a .rpx file with whatever project name you enter: e.g. Example1 g Example1.rpx.

Path

By default the Wizard places the file in the folder where Repute was installed, under Projects.

Description

This text appears on the project report.

Project ID

Any alphanumeric text. This also appears on the project report.


Step 2 - Select the design standards you want to use in this project

The number of design standards available depend on which edition of the program is running. For access to all the design standards you need Repute 2 Enterprise edition.

Step 3 - Define the scenarios to create in this project

No. of construction stages

The number of stages must be between 1 and 10.

Longevity

The longevity can either be Persistent, Transient, Accidental, or Seismic.


How to . . .

Operate the functions of the Wizards