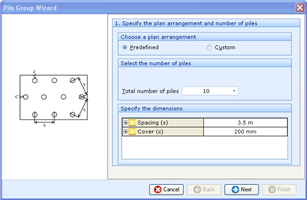
Pile Group Wizard


Description

The Pile Group Wizard helps you to create a pile group of any size on a grid layout you specify. The wizard lets you decide the size, type and properties of the piles, as well as the position and size of the group.

The best way to learn how to use this wizard is to follow Tutorials 4 and 6 in the Quick-Start Guide, which make use of this wizard.

Below are screenshots of the different steps that the wizard takes you through.


Process

To create a new pile group, the Pile Group Wizard takes you through the following steps:

Step 1 - Specify the plan arrangement and number of piles

Plan Arrangement

Number of piles

For a predefined arrangement, this can be between 1 and 11. The image on the left of the box illustrates the pile arrangement.

For a custom arrangement, the Wizard creates a quadrilateral group with sides of length m x n piles.  Values m and n can be between 1 and 100. The total no. of piles is a product of these values and is displayed in the Wizard.

Dimensions

Step 2 - Select the pile type and enter its properties

Choose the pile type

The pile type can be either Bored, Augered, or H pile.

Select the key section properties

Step 3 - Enter the pile length and rake

Step 4 - Enter the location and rotation of the group centroid

The diagram within the Wizard illustrates what these values relate to.

Step 5 - Select the scenarios in which to place this pile group


How to . . .

Operate the functions of the Wizards