In Step 3, you will create a stiff clay and specify its properties.
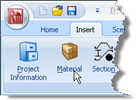
Open the Stockyard‘s Materials group by selecting the Insert tab on Repute’s ribbon and clicking on the Material button.
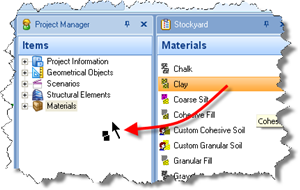
When the Stockyard appears, click on the item labelled “Clay” and keep the left mouse button pressed.
Drag the cursor away from the Stockyard towards the Project Manager. The cursor will change to signal you are dragging.
Finally, release the left mouse button when the cursor is located over the Project Manager to drop the clay there, where it will appear as Soil 1 (under the heading “Materials”).
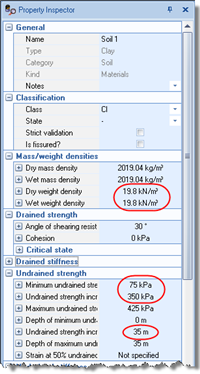
Next, open the Property Inspector for “Soil 1” by double-clicking on it within the Project Manager.
Under the category Mass/weight densities, change the clay’s dry and wet weight densities to 19.8 kN/m3. (You will need to set the dry weight density first, to avoid getting error messages.)
Under the category Undrained strength, change the clay’s minimum undrained strength to 75 kPa. Enter 350 kPa in the box labelled “Undrained strength increase” and 35 m into the box labelled “Undrained strength increases over distance” (i.e. the thickness of the clay layer). This results in a strength gradient of 10 kPa/m.
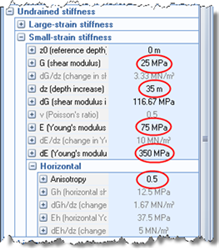
Under the category Undrained stiffness, double-click on the heading Small-strain stiffness (or the + button to its left). The inspector will expand to show various controls for setting the clay’s undrained stiffness.
Type 75 MPa into the E (Young’s modulus) editor and press Enter. The G (Shear modulus) editor will automatically change to show 25 MPa.
Type 35m into the dz (Depth increase) editor and press Enter. (This represents the thickness of the clay layer.)
Type 350 MPa into the dE (Young’s modulus increase) editor and press Enter. The dE/dz (Change in Young’s modulus with depth) editor will automatically change to show 10 MN/m3, corresponding to dE/dz = 350 MPa / 35 m. The shear modulus values will also change automatically.
Under the Horizontal category, type 0.5 into the Anisotropy editor and press Enter. The corresponding Eh (Young’s modulus) editor within that category will automatically change to show 37.5 MPa (i.e. 75 MPa x 0.5). The Gh (Shear modulus) editor will also change accordingly.
A copy of this step can be found at [Projects]\Tutorial 5\Step 3.rpx.
Step 4 - create a layer and borehole