In Step 2, you will create 4 piles and connect them together in a pile group.
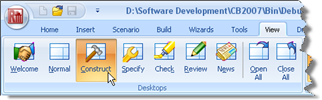
Switch to Repute’s Construction Desktop by selecting the View tab on Repute’s ribbon and clicking on the Construct button. (The Construct Desktop displays the Drawing Board, Project Manager, and Stockyard.)
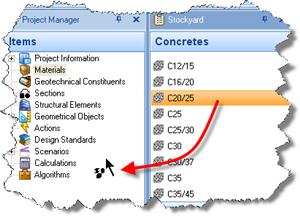
In the Stockyard, click on the heading labelled “Concretes” to open the Concretes group.
Then click on the item labelled “C20/25” and keep the left mouse button pressed.
Drag the cursor away from the Stockyard towards the Project Manager. The cursor will change to signal the dragging operation.
Finally, release the left mouse button when the cursor is located over the Project Manager to drop the concrete there, where it will appear as Concrete 1 (under the heading “Materials”).
Back in the Stockyard, click on the heading labelled “Structural Elements” to open the Structural Elements group.
Then click on the item labelled “Bored Pile” and drag it to the Project Manager, in the manner described above.
Repeat the previous instruction for “Pile Group”.
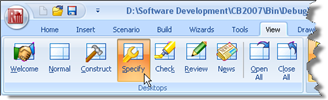
Switch to Repute’s Specification Desktop by selecting the View tab on Repute’s ribbon and clicking on the Specify button. (The Specification Desktop displays the Drawing Board, Project Manager, and Property Inspector.)
In the Project Manager, select Pile 1 (located under the heading “Structural Elements”). The Property Inspector will change to show its properties.
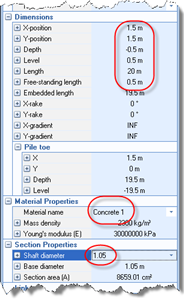
In the Property Inspector, under the heading “Dimensions”, change the pile’s X-position to 1.5m, its Y-position to 1.5m, its Length to 20m, and its Free-standing length to 0.5m.
Under the heading “Material Properties”, select “Concrete 1” in the Material name box.
Finally, under the heading “Section Properties”, change the pile’s Shaft diameter to 1.05m.
Next, duplicate Pile 1 by right-clicking on it in the Project Manager and selecting the Edit > Duplicate command. “Pile 2” will appear in the Project Manager and its properties in the Property Inspector.
In the Property Inspector, change the X-position of Pile 2 to −1.5m and press Enter. Leave all its other properties unchanged.
Duplicate Pile 2 by right-clicking on it in the Project Manager and selecting the Edit > Duplicate command.
In the Property Inspector, change the Y-position of Pile 3 to −1.5m and press Enter. (Note, its X-position will also be −1.5m.)
Finally, duplicate Pile 3 and change the X-position of “Pile 4” to +1.5m. (Note, its Y-position will be −1.5m.)
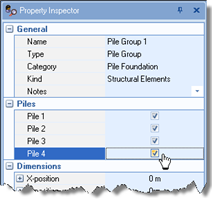
In the Project Manager, select Pile Group 1. The Property Inspector will change to show its properties. Then place ticks next to all four piles.
Lastly, select Stage 1 (under “Scenarios”) in the Project Manager and tick “Pile Group 1” in the Property Inspector to add the pile group to the scenario.
In this step you have:
Created Concrete 1, Pile 1, and Pile Group 1
Linked Pile 1 to Concrete 1
Duplicated Pile 1 as Pile 2 and changed its location
Duplicated Pile 2 as Pile 3 and changed its location
Duplicated Pile 3 as Pile 4 and changed its location
Added Piles 1-4 to Pile Group 1
Adds Pile Group 1 to Stage 1
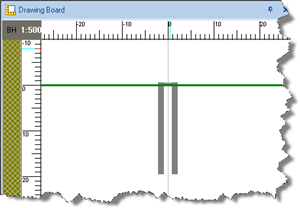
The Drawing Board will now look something like the screenshot below:
A copy of this step can be found at [Projects]\Tutorial 4\Step 2.rpx.
Step 3 - create the soil