
In Step 4, you will create a pile and specify its cross-section and concrete grade.
Open the Stockyard by selecting the View tab on Repute’s ribbon and then clicking on the Construct button.
When the program has switched to its Construction Desktop (in which the Drawing Board, Project Manager, and Stockyard are displayed), right-click anywhere inside the Stockyard to display its context menu and select the Concretes command. The Concretes group will open.
Create the concrete by holding the Ctrl key down and clicking on the item labelled “C30/37”. (When the Ctrl key is pressed, Repute automatically creates any item that you select in the Stockyard.) The newly-created concrete will appear in the Project Manager (under Materials).
In the Project Manager, right-click on the newly-created concrete (“Concrete 1”) to display its context menu and select the Properties... command. The Property Inspector will appear.
In the Property Inspector, change the Weight density (under Mass/weight densities) to 25 kN/m3 (which is the recommended weight density of reinforced concrete according to Eurocode 1).
Next, click on the Stockyard’s Structural Elements caption (near the bottom of the Stockyard). The Structural Elements group will open.
Create the pile by holding the Ctrl key down and clicking on the item labelled “Square Pile”.
The newly-created pile will appear in the Project Manager (under Structural Elements).
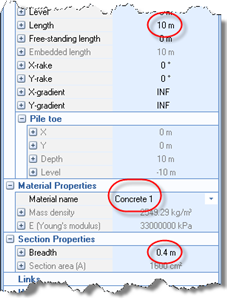
In the Property Inspector, change the Material Name (under Material Properties) from “Not specified” to “Concrete 1”. Then change the pile’s Length (under Dimensions) to 10 m and its Breadth (under Section Properties) to 0.4 m. Leave all other properties of the pile unchanged.
Returning to the Project Manager, select Stage 1 (under Scenarios).
In the Property Inspector, place a tick next to Pile 1 (under Structural Elements) to add the pile to this scenario. Press the Enter key to refresh the Drawing Board.
In this step, you have:
Created Concrete 1 and Pile 1
Linked Concrete 1 to Pile 1
Added Pile 1 to Stage 1
A copy of this step can be found at [Projects]\Tutorial 3\Step 4.rpx.
Step 5 - create the forces