 Drawing
BoardDrawing
Board
Drawing
BoardDrawing
BoardThe Drawing Board provides a scaled representation of the selected scenario. Its scale is shown in the top-left corner. Rulers are located on the top and the left edges of the board.
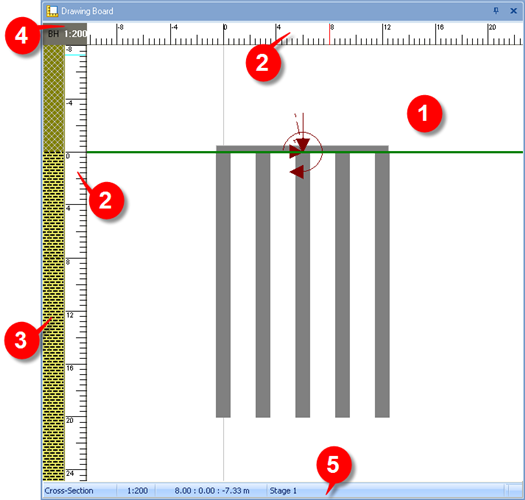
The Drawing Board consists of:
The drawing
Vertical and horizontal rulers
A soil column
A scale indicator
A status bar
When the Drawing Board is visible, the Drawing Board tab is displayed on the Ribbon, which provides buttons relating to the panel.

The commands on the Drawing Board tab are arranged into the following groups: Select/Zoom, Orientation, Scale, and Show/Hide.
The mouse cursor can be used to select an item on the drawing or alternatively you can select an area to enlarge using the zoom key.
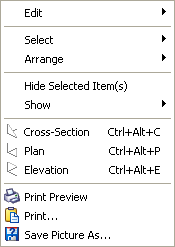
By choosing the appropriate button on the Drawing Board tab or context menu or using the keyboard shortcuts listed below, you can switch between one of three orientations:
Cross-section (Ctrl+Alt+C)
Plan (Ctrl+Alt+P)
Elevation (Ctrl+Alt+E)
All these orientations follow the left-hand notation. By switching orientation, the direction of the x, y, and z axes change as shown in the table below.
|
Orientation |
x |
y |
z |
|
Cross-Section (Default) |
g |
Into screen |
i |
|
Plan |
g |
h |
Into screen |
|
Elevation |
Out of screen |
g |
i |
The scale can be adjusted on the tab from a ratio of 1:10 to 1:1000.
By choosing the appropriate button on the Drawing Board tab or under Show on the context menu, you can show or hide a variety of drawing features:
Origin
Select the Origin button to display horizontal and vertical grey lines whose intersection indicates the point of origin
Left-click on the button again to turn off this feature
Grid
Select the Grid button to display points on the drawing which form a grid
Mirror Image
Select the Mirror Image button to reverse the direction of axes whose positive direction points to the right (see table under Orientation). For example, under Cross-Section orientation, the x-axis would point positively to the left
For more options to select, edit, and arrange items, right-click inside the Drawing Board or directly on an item. This also gives you shortcuts to change the drawing’s orientation and display settings, as well as options to print and save.
The Drawing Board status bar is located at the bottom of the panel and displays the current orientation, scale, position of the mouse cursor from the origin, and scenario selected in the Project Manager.

Left-click on the Select button on the Drawing Board tab
Move the mouse cursor over an item and left click (when the mouse is over the item, the cursor changes from a cross-hair to a hand)
This automatically selects the item in the Project Manager and display its properties in the Property Inspector (if open)
The Re/x Design Studio synchronizes panels so that when an item is modified in the Property Inspector, it is automatically updated on the Drawing Board.
Right-click inside the panel to reveal the context menu and choose Select > All Items
Click on the Zoom button on the Drawing Board tab
Left click and drag inside the drawing to form the area which you would like to enlarge to the full screen
Or... Click on the Increase Scale button until the desired scale is reached (alternatively you can select an exact scale size from the Drawing Board tab e.g. 1:100)
Or... Right-click on the horizontal or vertical rulers for a list of scale sizes to choose from
Left-click anywhere in the Drawing Board
Drag the mouse cursor to reposition the drawing
The vertical and horizontal rulers will automatically adjust to match the origin on the drawing
The Soil Column displays the Borehole that is currently present in the scenario shown in the drawing.
Left-click in the Soil Column to select the borehole in the Project Manager and display its properties in the Property Inspector (if open)
Ctrl + left-click to select individual layers of the borehole
Shift + left-click to select the soil within the layer
Right-click inside the panel to reveal the context menu and choose Edit > Copy to Clipboard
Right-click inside the panel to reveal the context menu and choose Edit > Copy to Clipboard
Right-click inside the panel to reveal the context menu and choose Save Picture As
Select the folder you want to save the file in
Right-click inside the panel to reveal the context menu and choose Printor usethe keyboard shortcutCtrl+P